Choosing a Claude plan and installing the Claude app
What this gets you: the Claude app on your Mac, signed in to a plan that can do the work, with a session open on the folder you point it at. You are sent here from: Start Here, before the first session, and again from milestone 01 when the plan question comes up.
If you are reading this before you buy: every step here works with any folder. The last two point Claude at the course folder, which comes with the course along with the file the final sentence names. Until then, this page is what the first minute looks like.
Before you start
- What the Claude app is. It is ordinary Mac software, made by Anthropic, that you download and install like any other app. Anthropic calls it Claude Desktop in its own documentation.
- What Claude Code is. It is one of the three sections inside that app, and it is the one that can read and change files on your Mac. It is the thing that does the building in this course. Nothing about it is a separate download: Anthropic's documentation says plainly that the desktop app includes Claude Code and that you do not need to install anything else.
- You need a paid plan. Anthropic's own documentation states it directly: Claude Code requires a Pro, Max, Team or Enterprise subscription. The free Claude plan does not include Claude Code.
- Have ready: a card, if you are subscribing today, and about ten minutes.
- Your Mac needs: macOS 13.0 or later, and 4 GB of memory or more. Those are the published requirements for Claude Code. Memory is the working space a Mac uses while programs run, a different number from storage, which is the room for files. To read yours, click the Apple menu at the top left of the screen, choose About This Mac, and find the line labelled Memory. Every Mac with an Apple chip shipped with 8 GB or more, so a Mac that passes the chip check in Day Zero passes this one. Xcode, which milestone 01 installs, asks for a much newer macOS, so check the guidebook's xcode-install.md page before you conclude your Mac is ready for the whole course. Ask Claude to open it, or find it on the course site.
The money conversation
Prices as of the date at the bottom of this page, read from Anthropic's own pricing page:
| Plan | Price | What it is for |
|---|---|---|
| Free | $0 | Does not include Claude Code. It cannot run this course. |
| Pro | $17 a month billed annually, or $20 a month | The floor. This course runs on it. |
| Max | from $100 a month | Comes in two sizes: five times Pro's usage, or twenty times. |
Three notes on that table.
Pro is enough to finish this course, and plenty of people will. What Pro is not is comfortable on a long building day. Every plan has a usage allowance that refills on a schedule, and on a heavy afternoon Pro can run out before the day does. When it does, Claude Code stops mid-step and tells you when the allowance comes back.
Max buys more room, and the weeks it is worth having are the weeks the app is actually being built. That is milestones 04 through 06, which are some way off.
Today is not the day to decide. Nothing in the first two milestones is heavy. Start on whatever plan you have, see how a real building day feels, and change later if it pinches. Changing plans takes a minute and does not disturb anything on your Mac.
Steps
Get a plan
- Open
claude.com/pricingin your browser. - Read the current prices there rather than the table above, since prices change and this page is a snapshot.
- Choose Pro if you have no plan yet.
- Complete the sign-up in Anthropic's own checkout. You press the payment button. Nobody presses it for you.
If you already pay for Pro or Max, skip all four and go to step 5.
Install the app
- Open
claude.com/downloadin your browser. - Click the button labelled Download for macOS. One button covers every Mac Apple sells, so there is no version to choose.
- Open the file your browser just downloaded. It is a disk image, which is a file that opens into a small window of its own rather than into an app.
- Do what that window shows you. On a Mac this is almost always dragging the Claude icon onto the Applications folder pictured beside it.
- Open Claude from your Applications folder.
- Sign in with the Claude account from step 4.
Your password goes into Anthropic's own sign-in screen. It never goes into a message to Claude, and the Mac remembers the sign-in, so this happens once rather than every session.
Open the part that builds apps
- Click the tab labelled Code, along the top of the window.
The app has three tabs. Chat is ordinary conversation, with no access to your files. Cowork hands Claude a long job to go away and do on its own. Code reads and changes files on your Mac, and it is the only one this course uses.
Point a session at a folder
A session is one continuous conversation about one folder. It keeps its own history and its own changes, and it stays in the list until you archive it, so the session you start today is the one you come back to next week.
-
Click New session in the list running down the left side of the window.
-
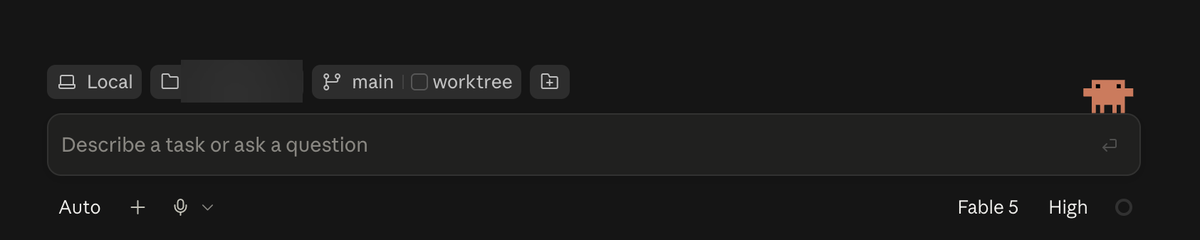
Choose Local where the app asks where the session should run.
Local means Claude works on this Mac, on the files in the folder you are about to choose. The other choices run Claude on computers elsewhere, which cannot see your course folder at all. Local is the only one this course uses.
-
Point the session at the course folder, in two moves:
- Click Select folder.
- Choose the course folder, the one Start Here section 5 had you drag to Documents, and confirm.
-
Type or paste the sentence the course starts with into the box at the bottom of the window, then press Return:
Read START-HERE.md and begin my course.
On a session that already exists, the sentence is
continue my courseinstead.
What it looks like when it worked
The Code tab opens rather than offering to sell you a plan.
A session appears in the list on the left, showing the name of the folder you chose, and the box at the bottom of the window waits for you to type.
From here, Day Zero has you unzip the course folder and start the first session on it. The way back in is the same every time: open Claude, click Code, click your course session in the list on the left, and type.
If it looks different
Anthropic ships this app often, so the window changes shape. What does not change is the shape of the check: the Code tab opens, you choose where the session runs and which folder, and a box waits for you to type.
If clicking Code offers to upgrade you instead of opening, the paid plan has not taken effect on this account yet. Finish the sign-up, then quit the app completely, since closing the window leaves it running, and open it again.
There is more than one way to run Claude Code, and a friend or another page may tell you about them. It also runs in a web browser, inside two code editors called VS Code and JetBrains, and as a typing-only version in a terminal window. They are all the same Claude Code. This course is written around the app because it needs nothing else installed first and it asks the least of a person who has never built software. The terminal route is written up in the appendix at the end of this page, and in the appendix at the end of Day Zero, for anyone who prefers it.
If it goes wrong
- Clicking Code asks you to upgrade. Symptom: a plan or upgrade screen
where the Code tab should be. Cause: the account signed in to the app has no
paid plan on it yet, or the payment has not landed. Fix: check at
claude.comthat the account you are paying for is the account you signed the app in with, then quit the app completely and open it again. - Claude Code says you have hit your session limit or your weekly limit.
Symptom: work stops part way through with a message naming a limit and a
reset time. Cause: the plan's usage allowance for this window is spent. Fix:
stop for now and come back after the time it names. Recent versions can wait
for the reset and carry on with the interrupted task by themselves. This is
the moment the Pro and Max conversation above becomes real, and
errors.md#claude-code-usage-limit-reached-mid-sessioncovers the options. - The session will not open on the folder you chose. Symptom: a message about failing to load the session. Cause: usually a folder that has been moved, renamed or deleted since the session was made. Fix: start a new session and select the folder where it actually lives now. Nothing in the folder is lost by doing this.
- An error mentioning
dyldorbuilt for Mac OS X 13.0. Symptom: the program refuses to start with a message about loading. Cause: this Mac's macOS is older than Claude Code supports. Fix: open the Apple menu, choose About This Mac, and read the version. Below 13.0, update macOS first.
Appendix: the terminal route
Nothing here is required. The app above is the supported route, and if it worked you are finished with this page.
Claude Code also comes as a typing-only version that runs in a window called a terminal, which is a window where you type one line of text, press Return, and the Mac does what the line says. It comes with every Mac and the app is called Terminal. Some people who have used one before would rather work that way. Installing it does not remove or disturb the app.
Open Terminal for the first time
- Press the Command key and the Space bar together. A search box opens in the middle of the screen.
- Type
Terminal. - Press Return.
A window opens with a short line of text and a blinking block or bar after it. That line is the prompt. It usually shows your Mac's name and the folder you are in, and it means the terminal is ready for you to type.
Two things to know about this window. You cannot click on the text to move the cursor, so use the arrow keys. And nothing here is dangerous by itself. A terminal that is sitting there doing nothing is exactly as harmless as it looks.
Install the typing-only Claude Code
-
Copy this line exactly:
curl -fsSL https://claude.ai/install.sh | bash -
Click into the Terminal window and paste it by pressing Command and V together.
-
Press Return.
That line downloads Anthropic's installer from claude.ai and runs it. Text
scrolls past while it works. When it finishes it prints
Claude Code successfully installed!.
The install asks for no password. It puts Claude Code inside your own home folder, which you already own, so macOS has nothing to ask permission for. Milestone 01 installs a different tool that does ask for your Mac password, and the guidebook's homebrew-password.md page explains why that one is different.
- Type
claude --versionand press Return.
The answer is a version number followed by (Claude Code), something like
2.1.211 (Claude Code).
- Type
claudeand press Return. - Follow what appears on screen. A browser window opens for you to sign in.
- Come back to the Terminal window when the browser says you are signed in.
To work in a particular folder from here: type cd with a space after it,
which is the command for moving to a folder, drag the folder from Finder onto
the Terminal window, press Return, then type claude and press Return.
If the terminal route goes wrong
command not found: claude. Symptom: the install said it worked, then typingclaudesays the command does not exist. Cause: the folder the installer used is not on the list of places your terminal looks, which it calls the PATH. Fix: the installer prints the exact repair line at the end of its output, underSetup notes. Scroll up in the Terminal window until you find it, copy it, paste it at the prompt by pressing Command and V together, and press Return. Then close the Terminal window, open a new one, and typeclaudeagain. The full fix is inerrors.md#command-not-found-claude.- The install prints web page code or a syntax error. Symptom: something
like
syntax error near unexpected token '<', or lines of<!DOCTYPE html>scrolling past. Cause: the download returned a web page instead of the installer. Fix: paste the same install line again and press Return. If it keeps happening, and if the page says Claude Code is unavailable in your region, that is a different problem with a different answer. Seeerrors.md#claude-code-installer-prints-html-or-a-syntax-error. - There is more than one way to install it. Another page, or a friend, may
tell you to use Homebrew (
brew install --cask claude-code) or npm. Those are two other programs that install software from the terminal, and both give you the same Claude Code. The line above needs nothing installed first and it keeps itself up to date in the background. A Homebrew install does not update itself, which is worth knowing if you pick that route.
Checked against: claude.com/download, code.claude.com/docs (desktop application, get started with the desktop app, quickstart, terminal guide, advanced setup, manage costs) and claude.com/pricing.
Last verified: 2026-08-29. Companies move their buttons. When a screen does not match this page, trust what the step accomplishes and tell Claude what you see.